Clearing your LinkedIn search history can help maintain your privacy and keep your browsing activities confidential.
According to a survey conducted by Statista in 2021 [source: Statista], around 62% of social media users are concerned about their online privacy. LinkedIn, being a popular professional networking platform, also prioritizes user privacy.
In this guide, we will walk you through the step-by-step process to clear your LinkedIn search history, ensuring your search activities remain private and secure.
Step 1: Log in to your LinkedIn account

To begin the process of clearing your LinkedIn search history, you need to log in to your LinkedIn account. Here’s how you can do it:
1. Open a web browser and visit the LinkedIn website:
Launch your preferred web browser and enter “linkedin.com” in the address bar. Press Enter or click on the search icon to navigate to the LinkedIn website.
2. Enter your login credentials:
On the LinkedIn homepage, you will find the login section. Enter the email address associated with your LinkedIn account in the provided field. Then, type in your password in the corresponding field. Make sure to double-check for any typing errors to ensure accuracy.
3. Access your LinkedIn account:
Click on the “Sign in” button to proceed. LinkedIn will verify your login credentials, and if they match, you will be granted access to your LinkedIn account.
By following these steps, you will successfully log in to your LinkedIn account, allowing you to proceed with the next steps of clearing your search history. It’s important to ensure the accuracy of your login credentials to avoid any login issues.
Step 2: Access your account settings

To clear your LinkedIn search history, you need to access your account settings. Follow the steps below to navigate to the settings page:
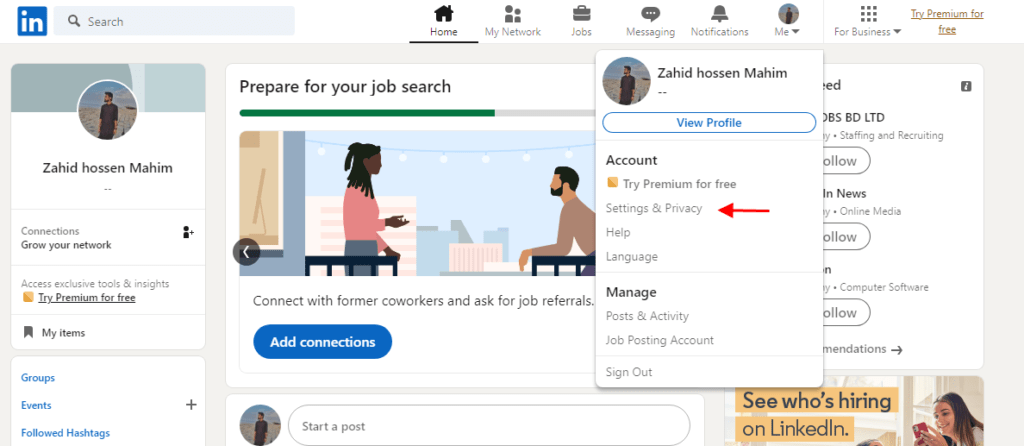
1. Locate the top right corner of the LinkedIn homepage:
Once you are logged into your LinkedIn account, look for the top right corner of the webpage. You will find your profile picture or the “Me” icon represented by a silhouette.
2. Click on your profile picture or the “Me” icon:
Hover your cursor over your profile picture or the “Me” icon, and a drop-down menu will appear. This menu provides various options to manage your account and settings.
3. Select “Settings & Privacy”:
From the drop-down menu, locate and click on the option labeled “Settings & Privacy.” This will redirect you to the settings and privacy page, where you can customize your LinkedIn preferences.
By following these steps, you will successfully access your LinkedIn account settings, allowing you to proceed to the next steps for clearing your search history. It’s important to regularly review your settings to ensure your privacy preferences are up to date and aligned with your needs.
Step 3: Go to the Privacy tab

When you’re logged into your LinkedIn account, accessing the Privacy tab is a crucial step to clear your search history effectively. Follow the instructions below:
Log in to your LinkedIn account: Open a web browser and visit the LinkedIn website. Enter your login credentials (email and password) to access your account.
Locate the “Settings & Privacy” section: After logging in, navigate to the top right corner of the LinkedIn homepage. Click on your profile picture or the “Me” icon to reveal a drop-down menu. From the options provided, select “Settings & Privacy.” This will direct you to the “Settings & Privacy” page.
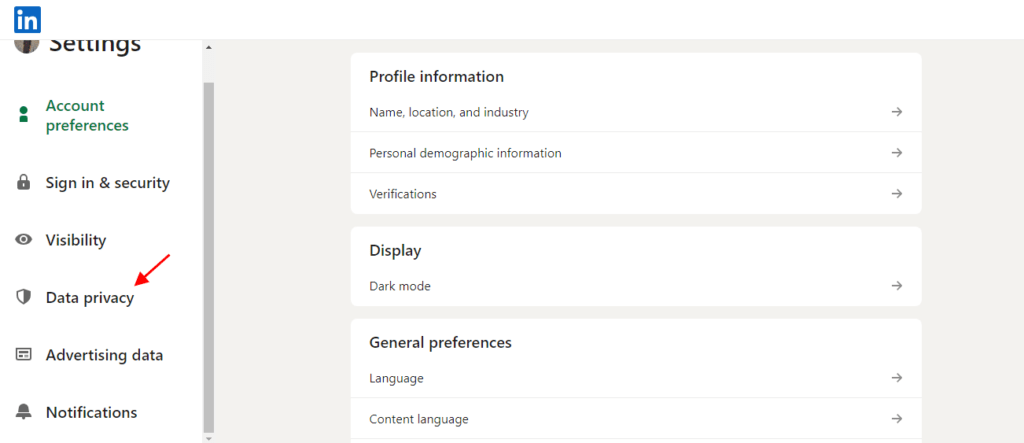
Find the Privacy tab:
On the “Settings & Privacy” page, you will notice different tabs available for customization and privacy management. Locate and click on the “Privacy” tab among the provided tabs. This will take you to the Privacy settings page, where you can adjust various privacy-related options.
Understanding the Privacy settings:
The Privacy tab offers a range of settings that allow you to control and manage your privacy preferences on LinkedIn. Take some time to review the available options and familiarize yourself with the settings and features it offers. This tab provides you with the ability to customize your profile visibility, control data visibility, manage account features, and more.
By accessing the Privacy tab, you gain the ability to fine-tune your privacy settings on LinkedIn, ensuring that you have full control over the visibility of your search history and other personal information.
Remember, LinkedIn regularly updates its interface and features, so the exact steps and layout may vary slightly over time. However, the Privacy tab should remain a prominent section within the Settings & Privacy area, allowing you to manage your privacy settings effectively.
Step 4: Manage your data privacy settings

To clear your LinkedIn search history, you need to navigate to the “How LinkedIn Uses Your Data” section within the Privacy settings. Here’s a detailed breakdown of this step:
1. Scroll down to Privacy settings:
Once you have accessed your LinkedIn account and clicked on the profile picture or “Me” icon, a drop-down menu will appear. Select “Settings & Privacy” from the options provided. This will take you to the main settings page.
2. Find the “How LinkedIn Uses Your Data” section:
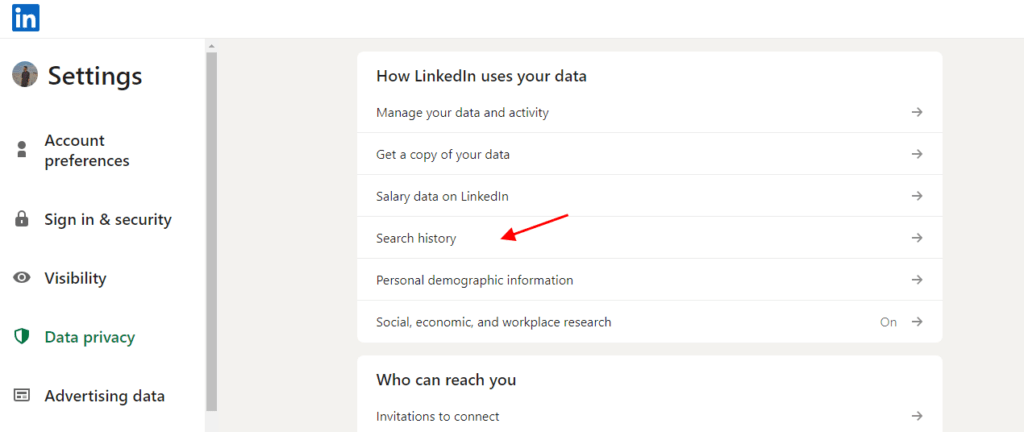
On the Settings & Privacy page, scroll down until you come across the “How LinkedIn Uses Your Data” section. This section allows you to manage various data privacy settings related to your account.
3. Locate the “Change” button for search history:
Within the “How LinkedIn Uses Your Data” section, you will find the specific setting related to search history. Look for the option titled “How LinkedIn Uses Your Data – Search History.” Next to it, there will be a “Change” button. Click on this button to proceed to the search history settings.
4. Access search history settings:
Clicking the “Change” button will take you to a new page or section where you can manage your search history settings. This page allows you to control and clear your search history on LinkedIn.
5. Clear your search history:
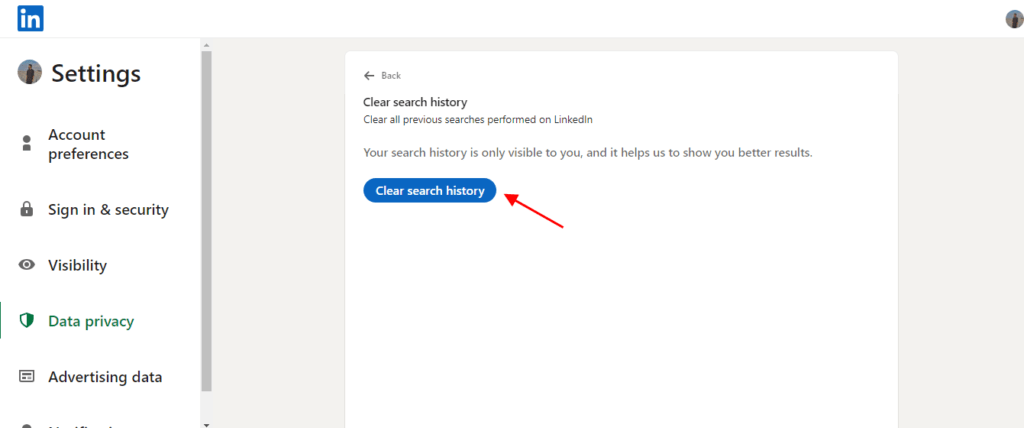
On the search history settings page, you will typically see a “Clear History” or similar button. Click on this button to initiate the process of clearing your LinkedIn search history. Depending on LinkedIn’s interface, you may be prompted to confirm your action.
By following these steps, you will be able to navigate to the relevant section in LinkedIn’s privacy settings, where you can manage and clear your search history. Taking control of your data privacy settings helps you maintain confidentiality and control over your LinkedIn activity. Remember to review your settings periodically to ensure they align with your privacy preferences.
Step 5: Clear your search history

To maintain privacy and remove your previous search activity on LinkedIn, follow these steps to clear your search history:
1. Access the “Search History” page:
On the Privacy tab of your LinkedIn account settings, scroll down until you reach the “How LinkedIn Uses Your Data” section. Look for the “How LinkedIn Uses Your Data – Search History” option and click on the adjacent “Change” button.
2. Review your search activity:
Once you’re on the “Search History” page, you will find a log of your recent search activity. Take a moment to review the searches listed, ensuring you understand that clearing this history will permanently delete the records.
3. Clear your search history:
To proceed with clearing your search history, locate the “Clear History” button on the “Search History” page. Click on it to initiate the clearing process.
4. Confirm the action:
After clicking “Clear History,” a confirmation dialog may appear, seeking your final confirmation to delete your search history. Read the message carefully to ensure you understand that this action is irreversible. If you’re certain about clearing your search history, click on the “Clear” button in the confirmation dialog.
5. Verification:
Once you’ve confirmed the clearing of your search history, the page will refresh, and your search activity log will be empty. This indicates that your LinkedIn search history has been successfully cleared.
Clearing your search history helps protect your privacy by removing the traces of your previous searches on LinkedIn. It ensures that your search activity remains confidential and helps maintain a clean record of your LinkedIn account. Remember that clearing your search history is a personal preference, and you can repeat this process periodically or as needed to maintain control over your search activity on the platform.
In conclusion, clearing your LinkedIn search history is an important step in maintaining your privacy and keeping your browsing activities confidential on the platform. By following the step-by-step process outlined above, you can easily remove your previous search activity from LinkedIn.
Regularly clearing your search history helps ensure that your search activity remains private and allows you to maintain control over your personal data on the platform. By taking these measures, you can enhance your privacy and enjoy a more secure LinkedIn experience.

